ACB Lighting Tutorial
The improvements in overall ambiance of the sales floor since 2010 makes it evident that the Lighting Tutorial has been working. The show keeps looking better, and it’s essential that we continually improve. We’ve updated our tutorial to address new issues that have arisen and give more tips on the best lighting for our environment. We want you to advance your skills in overcoming competing visuals and crowd distractions with effective lighting. The Armadillo seeks to keep low lit aisles and dark ceilings so good booth lighting can add a higher level of quality to the visual appeal.
Lighting improvements help everyone. Every improvement someone makes is good for themselves and all their neighbors. So this applies to all of us.
Armadillo Lighting Goal
Our goal is for each of you to put the most attractive quality and quantity of light on your product, while at the same time we expect you to:
- Comply with all Armadillo and City of Austin safety requirements
- Block light beam from going over or around the wall into your neighbor’s booth
- Avoid eye bite on and around the artwork/merchandise and in the aisles
- Reduce the level of light bleed that illuminates the ceiling
- Enhance the low-lit, warm and cozy ambiance of the room
We know eye bite cannot be completely eliminated. We want artists to endeavor to put their best light focused on their work, while containing your beam spread within your booth.
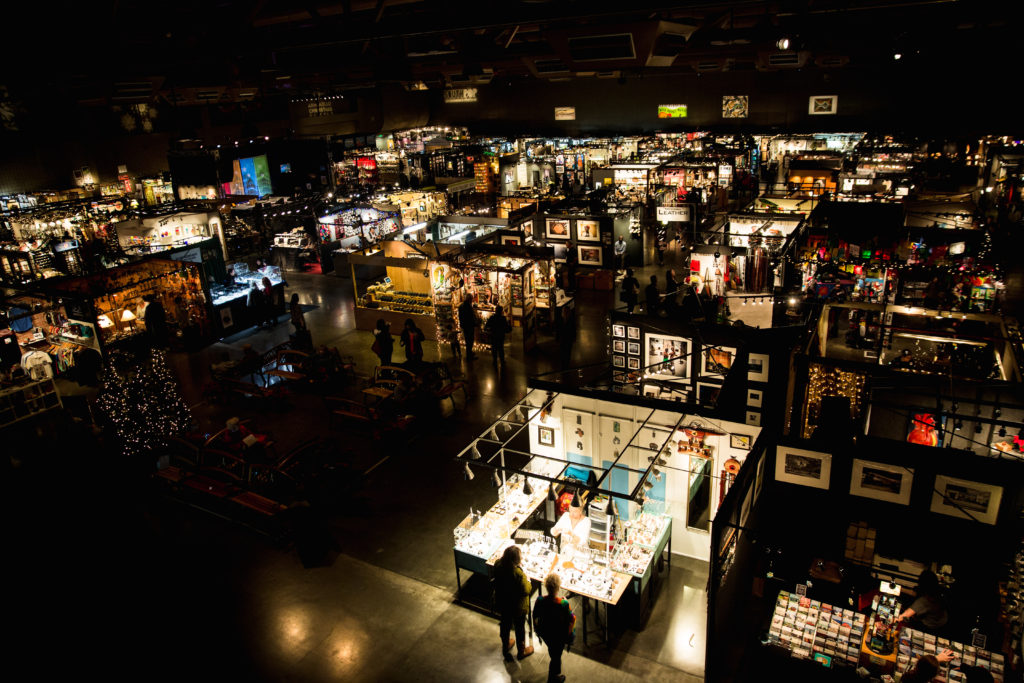
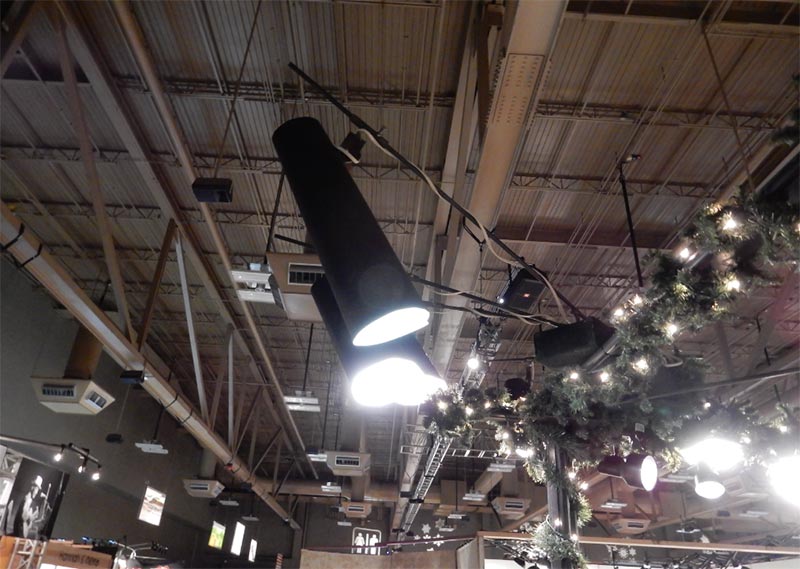
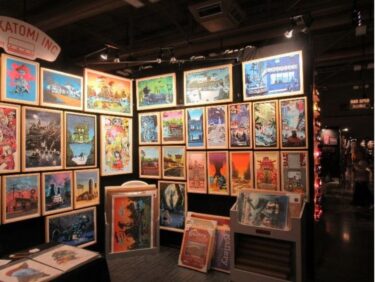
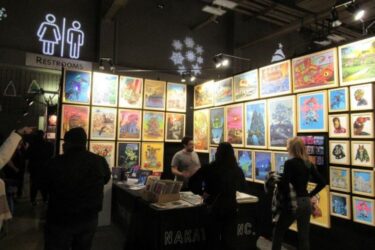
We are not lighting experts. We have observed this show intensely for years and noted the effects caused by excellent to awful lighting and all points in between. Between 2007-2010, our aisles and ceiling kept getting brighter at a time when we needed to re-establish that warm, cozy, and softly lit ambiance that adds charm to our show. (see photo below)
Some of our artists who had reported drops in sales, had recently changed their lights and added a higher degree of eye bite to their booth. We want lighting that highlights your work, avoids visual distraction, and will allow your customer’s eyes to relax and appreciate the quality of your work.
Principles of Lighting
Eye Bait – The individual parts and cumulative effects of everything you do to attract the customer’s eyes to your work. Your goal is to create an alluring presentation. You want the customers to look at the display long enough to appreciate the originality, skill, workmanship, and care that went into creating your merchandise. Effective lighting highlights the quality and appeal of your presentation. Your lighting must allow the customer’s eyes to be comfortable while approaching your work. Lighting can be a big factor in reaching your sales potential. The lighting system should mostly disappear while the lights make the artwork glow and illuminate the room.
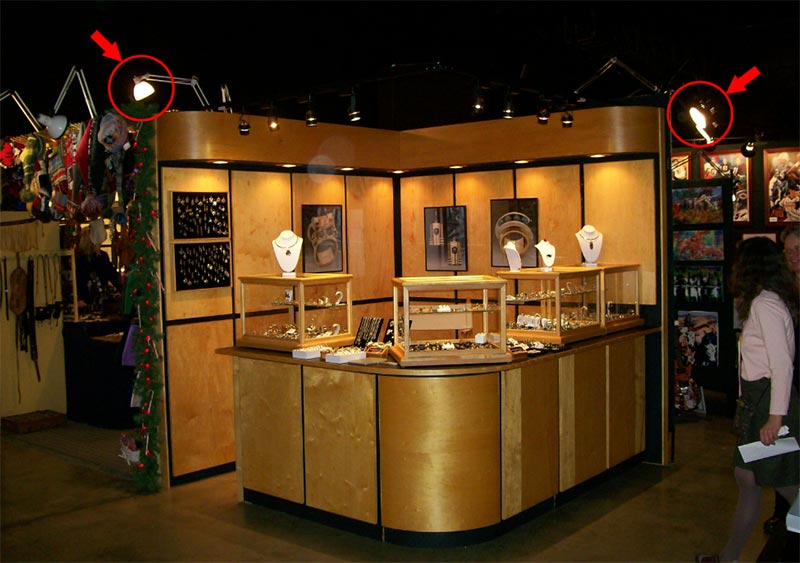
Eye Bite – Any unintended lighting effect, which causes the eye to divert. Just as eye bait makes the patron’s eyes comfortable and attracts them to your work, eye bite irritates the eyes and turns them away from your display. It can be as simple as a minor irritation from a vent on the side of a track fixture. Under our low light conditions, catching the business end of a halogen light bulb right in the eye is a noticeable and discomforting experience. Eye bite will reduce customer interest in your display. The following are common sources of eye bite:
- Misdirected light
- Side bleed
- Too much light on a product, especially on a high gloss surface
- Miscellaneous (facility lighting, sunset, neighboring booths)
Controllable Distraction:
Some distractions are not in your control. Pay attention to the ones that you can do something about, especially things that:
- Clash with your eye bait
- Distract the customers’ attention away from your work
- Diminish your customers’ perception of value for your work
- Cause your customers to feel uncomfortable or unsafe
WHAT TO LOOK OUT FOR
[row ]
Pay attention to these areas to enhance your eye BAIT:
Eye Bait –The individual parts and cumulative effects of everything you do to attract the customer’s eyes to your work.
- Angle, direction, and distance
- Brightness/intensity
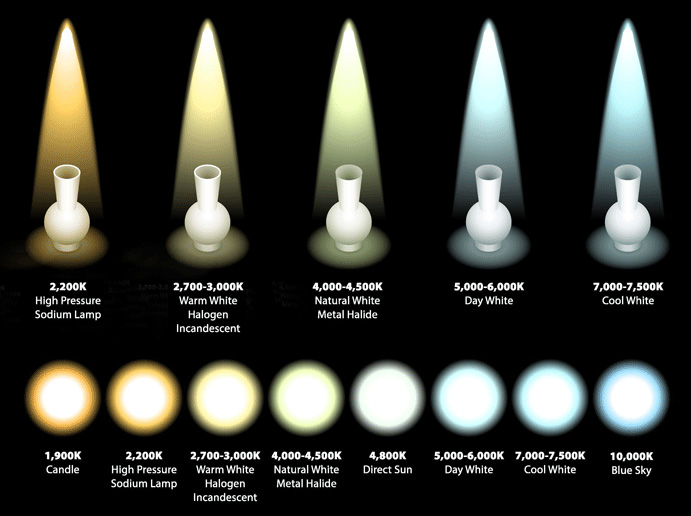
- Color temperature/spectrum quality of light: resource one, resource two
Pay attention to these issues to reduce your eye BITE:
Eye Bite – Any unintended lighting effect, which causes the eye to divert away from your display.
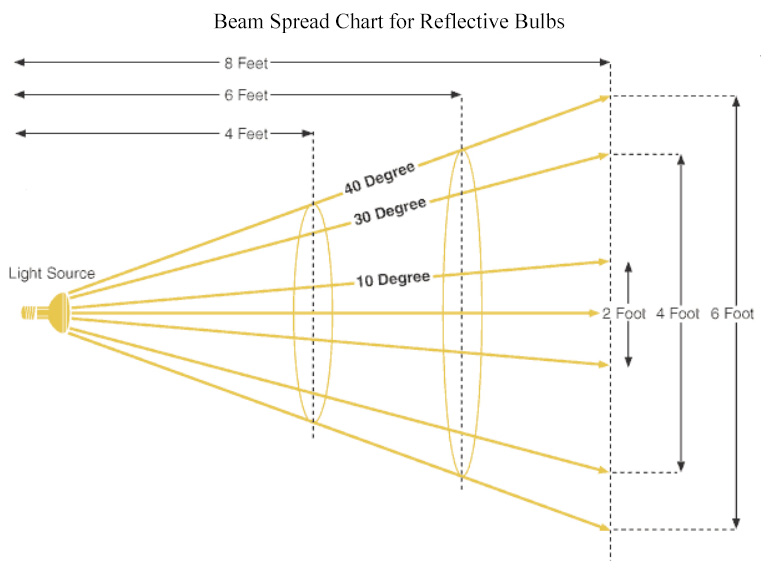
- Beam spread/angle of beam projection (look at the above beam chart for reference)
- Beam control/cowling
- Side and back light leakage
- Distracting shadows & reflections

Troubleshooting:
Issue: Glare into the aisles or booth entrances, caused by light escaping past the borders at wall ends and booth fronts. Using interior panel display lights pointed toward the aisle where unwanted beam spread is particularly counterproductive.
Possible Solution: Use of narrow beam directional lights and/or ample cowling to control the edges of the beam around non-directional bulbs or theatrical barn door devices. Aim any front perimeter truss lights down and/or in, but not towards a side wall. Avoid non-directional bulbs in critical areas.
Pay attention to these tricky areas:
[row ]
[col span=”1/4″ ]
- Wall ends at aisles
- Corner point displays
- Interior panels
- Corner booth fronts
- Front counter
[/col]
[col span=”1/4″ ]
- Inside jewelry cases
- Interior wall items
- Under shelves
- Ceiling brightness
- Use of floodlights
[/col]
[col span=”1/4″ ] [/col]
[/row]
(Click to enlarge photos for full view)
Examples of good undershelf lighting.
[fancygallery id=”3″ album=”4″]
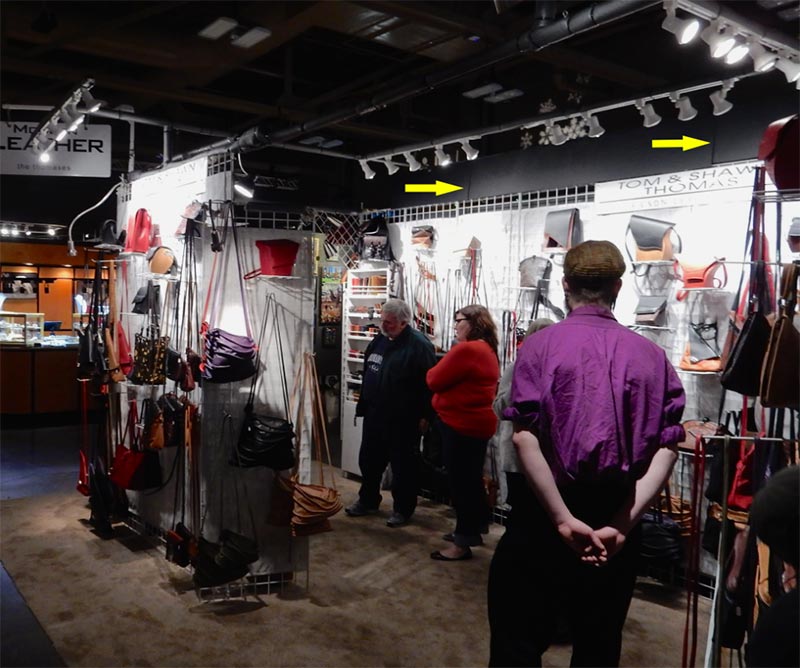
One way to reveal your eye bite sources is to use a cheap digital camera to photograph your display and lighting fixtures from every customer approach angle, with and without flash. You have become accustomed to your own lights so your experience of them is similar to the flash photos. Your customer sees your display similar to the no flash photos but at a lower intensity.
[row ]
[col span=”1/2″ ]

This is what you think your lights look like.
[/col]
[col span=”1/2″ ]

This is how side vent light bleed actually looks like to the customer in the Armadillo Bazaar environment.
[/col]
[/row]
NOTES ON TYPES OF LIGHTING
Please shop around online, you can find the best selection of components at the best prices. It doesn’t have to be a huge expense. Avoid spending big bucks at the big box stores
Floodlights:
There are many types of floodlights. They vary from very narrow spots at 7 degrees to very wide floods at 120 degrees. Please pick the type of bulb that fits your needs. Too much spread can’t be controlled, too little spread doesn’t cover enough merchandise. Floodlights with insufficient coating on the sides are counter-productive, especially when mounted on arm lamps with the cowling removed. Refer to the beam spread chart to pick the best lights for your booth.
Here’s a great interactive Beam Angle Guide.
Beam Angle Explained.
(Click to enlarge photos for full view)
Examples of arm lamps with cowling removed from worst to best.
[fancygallery id=”3″ album=”6″]
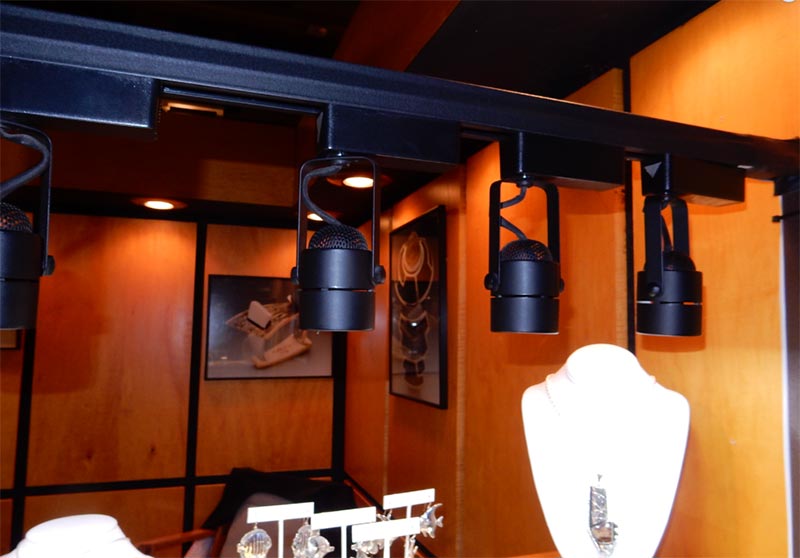
Truss, track and overhead lighting:
To avoid visual distractions, your truss, track and fixtures should all be the same color. Track lighting fixtures located on a front perimeter truss are most effective pointed straight down or very slightly inward. Components are less noticeable if they are all black
(Click to enlarge photos for full view)
[fancygallery id=”3″ album=”7″]
Troubleshooting:
Halogen track lighting fixtures located on a front perimeter truss are most effective pointed straight down or very slightly inward. Fixtures in this location are not effective for lighting wall ends. Similar fixtures located on interior trusses are better placed for lighting back and side walls.
Use of narrow beam directional lights and/or ample cowling to control the edges of the beam around non-directional bulbs or theatrical barn door devices. Aim any front perimeter truss lights down and/or in, but not towards a side wall. Avoid non-directional bulbs in critical areas.
Recommended track lights:
[fancygallery id=”3″ album=”8″]
Arm lamps:
We strongly recommend this arm lamp style:
Alvin G2540-B Swing Arm lamp, black with a DOUBLE BAFFLE for glare reduction. (this one works with many types of bulbs)
[fancygallery id=”3″ album=”9″]
Arm lamp issues:
[fancygallery id=”3″ album=”10″]
Various popular fixtures and bulbs:
[fancygallery id=”3″ album=”11″]
MR 16 bulbs: range from $1-$8 depending on Kelvin temperature and mounting. The ones pictured are all around $3. The higher priced bulbs are the Solux brand, for special Kelvin temperature color spectrum needs.
Westinghouse Specs: PAR 20 narrow flood, 39 watts, 380 lumens, 30 degree beam spread, color temp. 2700K – usually available for under $5 – PAR 30, narrow flood also available.
What should I do now?
We’re not asking you to rush out and buy any of the items we’ve listed here. We want you to think about how you can improve your lighting this year. Please plan ahead and get what you need early so you are not stuck with poor, last minute choices from the big box stores. Some of you have more knowledge and experience with lighting fixtures, bulbs and other components than we do. We encourage any of you with the interest and expertise, to step up and mentor the rest of us. We can get the best results if we learn from each other. Other artists may have successfully dealt with any problems you might be having. Learn from them before you spend money. We’ll be glad to help you, too. We want you to have a better understanding of how the role of lighting effects your customer’s perception of your booth. We want you to advance your skill level to enhance your overall lighting quality for every show you do. Let us know when you find successes in lighting your booth, so we can share.
Please reach out to us for advice and / or use our Facebook group to discuss with your fellow artists.
What do all those letters on a bulb package mean?
The letters stand for a specific characteristic of the bulb (called a lamp by light bulb companies).
PAR stands for Photosynthetic Active Radiation (PAR) Units and the number is a measure of the units. PAR lamps are Halogen lamps and also contain an internal reflector coating as well as a prismatic lens to maximize light output. PAR lamps deliver a stronger punch of light than R lamps with better beam control.
AR means Aluminum Reflector, used for accent and display lighting (spots in essence)
R means reflector, again a more focused light or a spot.
T refers to Tri-phosphor fluorescent lamps, which have an improved red light emission compared to Halo phosphor (H) lamps.
FS refers to a full range of emitted light across the whole visible spectrum
A-lamps require reflectors to effectively control and distribute light. These are the old-fashioned standard light bulb.
BR lamps contain an internal reflector coating that creates distribution patterns ranging from spot to flood. These lamps are well suited for accenting and wall washing where directional control is required.
Appendix to Lighting Tutorial
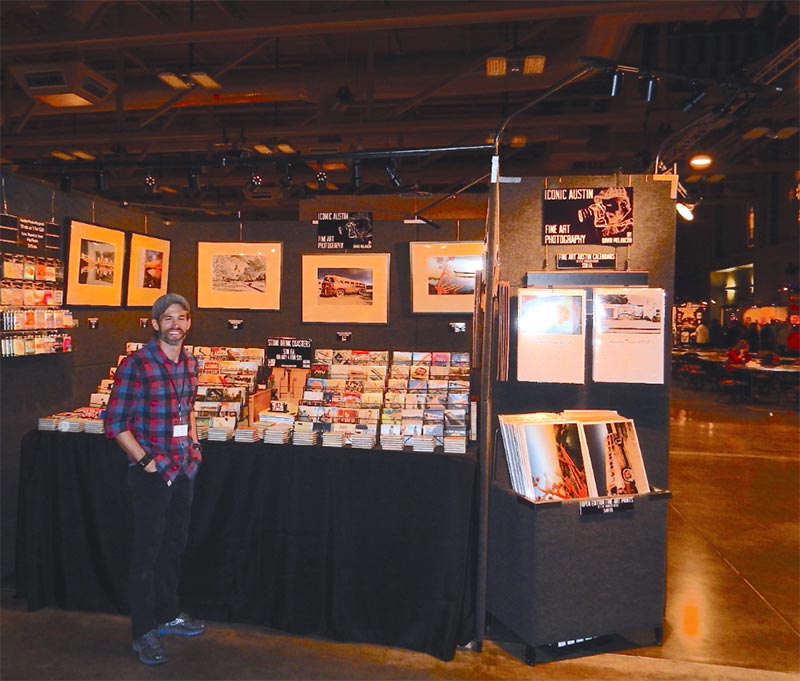
The overall effect of lighting at the Armadillo Christmas Bazaar, featuring dark ceilings, dimly lit aisles, minimum glare, and brightly lit artwork makes a huge difference in the sales potential for each individual artist.
This effect is achieved by having every participant follow Armadillo lighting standards.
Beam edges need to be made controllable. This can be accomplished by using bulbs of 500 Lumens or less with a 40-degree or less beam spread, fixtures with cowling, track lighting hung below the wall top, effective lighting angles, 32” arm lamps for wall surfaces closest to the aisles, and a larger number of fixtures selectively aimed. Some components work a lot better than others.
At the Armadillo, we require artists to use only lighting components that can be configured so that the bright part of any bulb cannot be seen at eye level from anywhere in an aisle, over a wall top, or in neighbor’s booth space.
Using ProPanel lighting components to create this effect can prove to be either very challenging or impossible, depending on the components used and the manner in which they are applied.
About ProPanel Lighting components at Armadillo:
ProPanel is well known for having excellent display panels and accessories ideally suited for use within a professional art tent in an outdoor setting. Their components also work well in an indoor facility with plenty of diffuse overhead lighting. Their panels, furnishings, and most accessories have been used with great success at Armadillo for years.
https://www.pinterest.com/propanels/pro-panel-booths-at-2016-armadillo-christmas-bazaa/
Their lighting components are different.
ProPanel lighting is carefully designed to work under a white tent top. It appears that their intention is to fill a need to illuminate the maximum amount of art display space with the fewest bulbs and the lowest power draw. Their components are well suited for that purpose.
Components designed for use under a white tent top or well-lit exhibition center can be counterproductive to the overall Armadillo lighting ambiance
ProPanel Lighting Components:
ProPanel Fixtures: These lighting fixtures are designed without beam spread limiting cowling because their system is intended to use the tent top to capture the beam spill and reflect it back in a diffuse manner, over the art. This design is not suitable for attaching additional cowling.
ProPanel Bulbs: These bulbs are designed with a wide 60-degree beam spread to cover more display space and an intensity of 1000 Lumens. These are difficult to use in the Armadillo environment because of high intensity and wide beam spread.
ProPanel Tracks: These track mounts are designed to stand tall, higher than wall tops, well up into the tent canopy to provide more distance for the beam to spread and more tent top reflection. Without a tent top to catch the beam, the light is prepositioned over the wall top, shining right into your neighbor’s space or an aisle.
Do not plan on using this type of track holder at the Armadillo unless you provide an additional light beam blocker as shown in the lighting tutorial section, Troubleshooting 1.
ProPanel Arm Lamps: (both single panel and/or double panel, both set length and/or telescopic)
These are designed to illuminate one or two panels from a position close to a display wall, right at the level of the wall top.
A few Armadillo artists have achieved some success with limited application lighting two-dimensional art and careful placement of these arm lamps.
This tricky application worked correctly when the artist aimed his side and back wall lights almost straight down, slightly tilted just a few degrees inward and away from the aisle. Lighting art near the wall ends at the aisles was the biggest challenge to get right.
Just a little change in the angle of the focus produces a different and undesirable effect allowing the light beam edge to spill into the aisle.
Generally, this lighting configuration and its components are not encouraged for use at Armadillo because of the limited application and the skill level needed to achieve the precise focus to keep the beam contained.
Occasionally, this approach may be appropriate for an artist with 2D work with distinctive texture, such as carved paint, due to the effect that steeply angled light would have on the work. The best result would come from having enough fixtures to always point the light straight down as to avoid having to angle any of the beams sideways.
Recommended Alternatives:
Track Fixture
Fixture – Step-down Cylinder – Black $12.38 In stock 090823
https://www.1000bulbs.com/product/173520/PLT-10220.html
Swing Arm Lamp
Globe 32” $20.55 In stock 090823
Globe Lamp Special Instructions for Armadillo
Change the Bulb:
This lamp comes with a small round light bulb included. While the light fixture is preferred for
Armadillo Bazaar use; the little bulb is not. Keep the little bulb at home or throw it away. Use only the
recommended PAR20 directional bulbs at the show.
Stiffening the Slippery Elbow:
The neck joint may be slipping because the powder coat on the metal is too slippery.
The fix: Make a nick on the paper ¼” off the corner of a crisp dollar bill. Carefully unscrew and
remove the middle wing nut, leaving the bolt in place. Use the tip of a pocketknife or a fingernail file
to get just a little bit of spread right between the upper arm section and the washer that is just inside
the triangular corner piece. The spread can be very small, just enough to insert the nicked corner of
the new dollar bill in the gap. Then replace and tighten the wing nut. Carefully tear off the dollar at
the nick leaving just the corner tip wedged in place. The cotton content in the paper provides the
grip. You now have a tight arm that is less likely to slip.
LED Bulbs
3000K
PLT 500 Lumens – 5.5 Watt – 3000 Kelvin – LED PAR20 Lamp $3.22 In stock 090823
https://www.1000bulbs.com/product/221937/PLTS-12025.html
4,000K
PLT 500 Lumens – 5.5 Watt – 4000 Kelvin – LED PAR20 Lamp $2.72 In stock 090823
https://www.1000bulbs.com/product/221939/PLTS-12026.html
Pre-Check: Please check with Bruce first if you are planning to use ProPanel lighting components at the Armadillo. Indicate the components that you want to use and how you plan to configure them to comply with Armadillo Lighting standards.